How to Generate a Windows 11 Pro QEMU VM Image
This guide covers preparing the environment, running the QEMU installation process, bypassing Windows 11 minimum requirements and network checks, and installing necessary VirtIO drivers for optimal performance.
Prerequisites
Ensure you have QEMU (qemu-system-x86) installed and the following ISO images downloaded:
en-us_windows_11_consumer_editions_version_23h2_updated_oct_2024_x64_dvd_4728d672.isovirtio-win-0.1.266.iso
Note: Follow these steps to set up QEMU and download the required ISO files:
1. Install QEMU
Run the command for your Linux distribution:
- Ubuntu / Debian:
sudo apt install qemu-system-x86 qemu-utils - Arch Linux:
sudo pacman -S qemu-desktop - Fedora / RHEL:
sudo dnf install qemu-kvm qemu-img
2. Download Required ISO Images
- Windows 11 ISO: Go to the official Microsoft Windows 11 Download Page, navigate to "Download Windows 11 Disk Image (ISO) for x64 devices", select the edition, and download it. Rename it to match the file listed above if needed.
-
VirtIO Drivers ISO:
Download the specific stable version required for this guide directly from the Fedora People Archive
(Search for
virtio-win-0.1.266.iso).
Step 1: Create the QEMU VM Image File
Initialize a virtual hard drive space with a copy-on-write allocation container block:
qemu-img create -f qcow2 win11pro_x86.qcow2 50GStep 2: Start the VM Installation
Use the following command (or wrap it in an install.sh script and Run it is chmod +x install.sh && ./install.sh) to boot the QEMU VM, mounting both the Windows ISO and the VirtIO driver ISO.
#!/bin/bash

# Configuration variables
RAM_SIZE="4096"
CPU_CORES="4"
DISK_IMAGE="win11pro_x86.qcow2"
ISO_IMAGE="en-us_windows_11_consumer_editions_version_23h2_updated_oct_2024_x64_dvd_4728d672.iso"

echo "Running QEMU VM..."
qemu-system-x86_64 \
    -machine q35,kernel_irqchip=on \
    -enable-kvm \
    -cpu host,kvm=off,hv_vendor_id=null \
    -bios /usr/share/ovmf/OVMF.fd  \
    -smp "$CPU_CORES" \
    -m "$RAM_SIZE" \
    -drive format=qcow2,file="$DISK_IMAGE" \
    -cdrom "$ISO_IMAGE" \
    -drive file=virtio-win-0.1.266.iso,media=cdrom,format=raw,id=drivers,if=none \
    -device usb-storage,drive=drivers,serial=drivers \
    -name "win11-pro" \
    -net none \
    -usb \
    -device qemu-xhci \
    -vga virtio \
ℹ️ System Notice
This macro environment setup pipeline script sequence opens your interactive workspace container viewport layout and directly binds target parameters.
Step 3: Follow the Windows Installer Prompts
- Select target workspace localization settings, layout schemas, and keyboard presets.
- Choose your configuration verification option or hit "I don't have a product key" to proceed.
- Isolate and lock down selection to Windows 11 Pro compilation stack settings.
⚠️ Bypass Minimum Requirements Check (TPM / Secure Boot / RAM)
If hardware checks throw a block error message reading: "This PC can't run Windows 11", inject these system registry overrides:
- Hit
Shift + F10terminal hook interface to launch interactive overlay terminal shell wrapper panel at the error screen. - Type this clean command into the terminal
- Close the terminal window.
- Click the Back navigation arrow on setup installer canvas window frame elements layout, click Next again, and verification boundaries drop away.
REG ADD HKLM\SYSTEM\Setup\LabConfig /v BypassTPMCheck /t REG_DWORD /d 1 /fREG ADD HKLM\SYSTEM\Setup\LabConfig /v BypassSecureBootCheck /t REG_DWORD /d 1 /fREG ADD HKLM\SYSTEM\Setup\LabConfig /v BypassRAMCheck /t REG_DWORD /d 1 /fREG ADD HKLM\SYSTEM\Setup\LabConfig /v BypassCPUCheck /t REG_DWORD /d 1 /f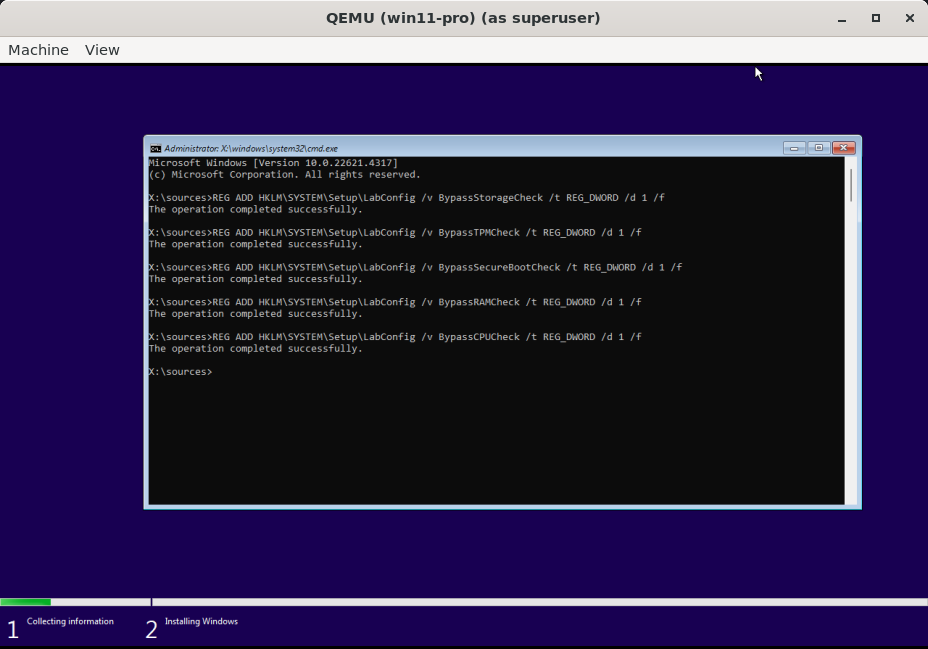
Step 4: Continue Installation
- Accept global deployment terms, software specifications, and baseline license contracts tracking items.
- Select custom manual installation track array parsing parameters: "Custom: Install Windows only (advanced)".
- Select space allocations blocks mapping (Drive 0 Unallocated Space) layout options targets to push deployment engine files.
💡 Target Partition Mapping Notice
If device targets fail to map visual container space, call out "Load driver" wizard hooks, index your active file paths down inside mount tracks container paths root tree directory containing virtio-win-0.1.266.iso, pull up amd64\w11 architecture target references, and target space profiles will pop up.
Step 5: Initial Windows Setup
- Select localization parameters framework arrays, regional location, and layout maps.
⚠️ Bypass Network Requirement (No Internet Setup)
If setup routines lock workflow layout loops behind network verification parameters checkpoints without a configured interface bridging connection profile active state context:
- At connection step blocking screen prompt layer canvas elements layout, invoke administrative terminal console block via
Shift + F10. - Input system configuration run parameter instruction string phrase explicitly:
OOBE\BYPASSNROand press enter. - The client hypervisor session triggers a localized platform initialization cycle refresh loop. Step back through initial baseline regional selector fields.
- This pass unlocks a newly accessible string variable option trigger parsing anchor layout link text: "I don't have internet". Select it to clean hurdles.
- Confirm path steps by clicking "Continue with limited setup" option links, and clear tracker questions items.
Step 6: Install VirtIO Drivers inside the VM
For better performance, network access, and correct display resolution adjustment, you must install the VirtIO drivers.
- Open File Explorer inside the VM.
- Click on the CD Drive labeled
virtio-win-0.1.266.iso(or similar name/drive letter). - Double-click on the installer binary (usually
virtio-win-gt-x64.exe). - Follow the installation prompts: Next > Accept license agreement > Next > Install.
- Click Yes when prompted by UAC.
- The system resolution should adjust automatically during or immediately after installation.
- Click Finish.
Your Windows 11 Pro QEMU VM is now ready for use. You can shut down the VM and remove the -cdrom options from your QEMU start script for future boots.